The MIX tab hosts the Vienna Organ Player's audio routing. Each of the manuals and the pedal have dedicated audio channels, which you can configure to suit your requirements.
Great Rieger Organ: Each of the manuals and the pedal as well as the room tone have dedicated audio channels, which you can configure to suit your requirements.
Synchron Molzer Organ: As a true Synchron instrument recorded at the Vienna Synchron Stage with multiple microphone positions, the channels correspond with Close, Mid, Main, … microphones. The Standard Library includes the stereo set, while the Full Library also provides you with state-of-the-art surround microphoning.
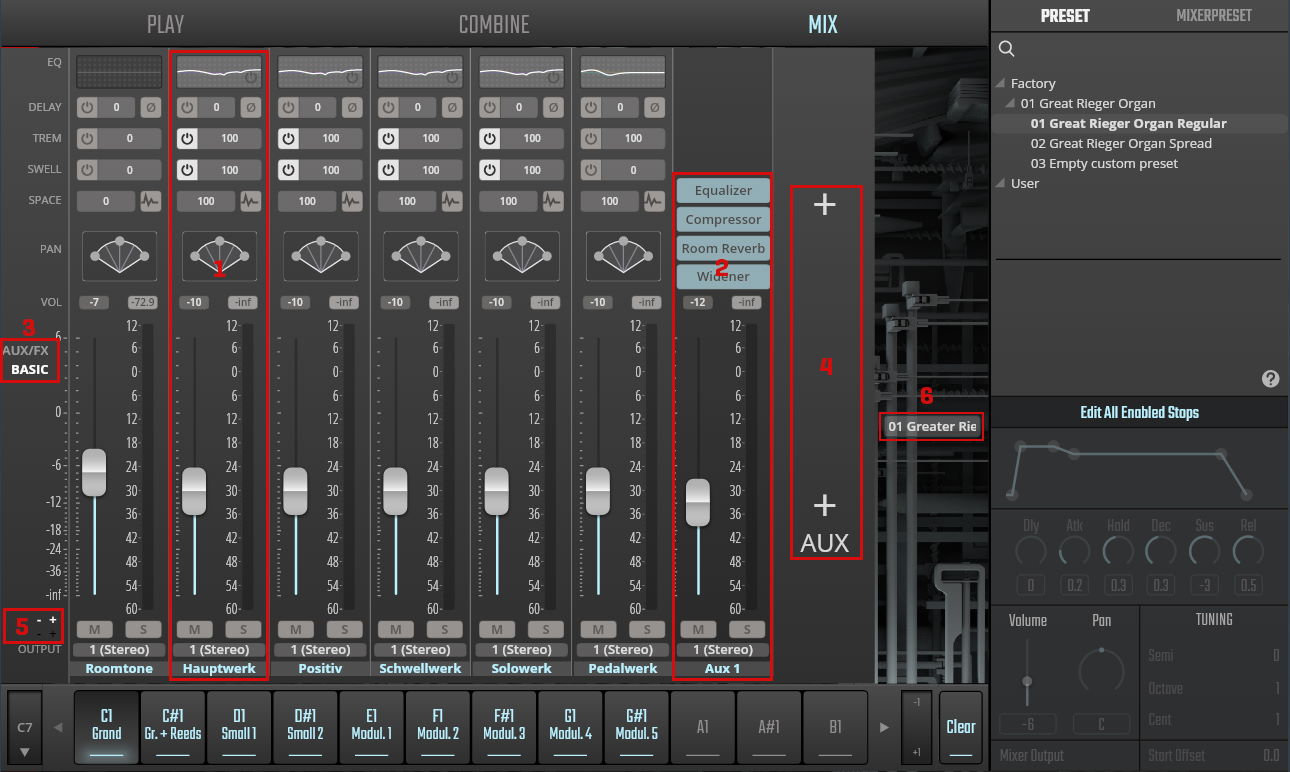
- Manual and pedal channels, including a room tone channel / microphone positions.
- Aux channel
- BASIC / AUX/FX view switch
- Add a mixer channel with the upper "+" sign, and a return channel with the lower one. You can define up to 4 return channels. If the symbols are covered by the browser panel, click on the Preset name above to fold it.
- Add mixer channel / remove last mixer channel (white -/+), add return channel / remove last return channel (black -/+).
- Mixer Preset flyout: Opens when you hover over the text fragment so that you can select another mixer preset or execute other mixer preset commands without having to go to the dedicated tab.
As customary, the lower half of a channel shows the volume meter, mute and solo buttons, channel output and its name. In the upper half, you will find different parameters according to whether you're in BASIC or AUX/FX view.
Channel mappings are saved together with the combinations they are linked to.

- EQ: A 5-band channel equalizer. On double-clicking, a window with all available settings will open. The power button is integrated in the channel view and becomes visible on mouse-over.
- Delay: Channel delay. Adjust these settings to add runtime to a channel, for impressive results in room perception. Values from 0 to 200 milliseconds.
- Phase: Here you can invert the channel phase – the phase icon turns orange when inverted.
- Tremulant: This determines the amount of tremolo for the channel, and is connected to the tremulant knob on the PLAY tab. Values between 0 (default) and 100.
- Swell: Determines the channel's swell or expression amount, and is connected to the swell knob on the PLAY tab. Values between 0 and 100 (default).
- Space: This parameter controls the channel’s release level. The organ’s release consists of the actual release samples of each note as recorded at the Vienna Konzerthaus, which are triggered by the length of the note played. For organs with multi-mic recordings like the Molzer, the SPACE parameter is synchronized across all mixer channels, i.e., any change to one channel will immediately be applied to all others as well.
- IR: Clicking on the wave icon opens the impulse reverb editing window, and allows you to add a convolution impulse response to the channel. There are dedicated IRs only for the Great Rieger Organ, but of course one can try them on another organ, too, and see what happens.
- Pan: Channel panning can be set to balance or power panning. Right-click to edit parameters.
- Volume slider values: Values between -inf and +6 dB.
- Volume slider: Grab the handle to adjust, or double-click to enter value.
- Mute: Mutes the selected channel. Turns red when muted.
- Solo: Solos the selected channel. Turns yellow when in solo mode.
- Output: Output assignment. Click to choose from the available outputs.
- Channel name: This also functions as an on/off button. Click to activate/deactivate. Right-click to rename or assign a MIDI CC.
Parameters with numerical values can be edited either by click-dragging or doubleclicking to enter the value, some (e.g., dB values) allow Shift-dragging for finer adjustment. Cmd/Ctrl-click to reset.
By clicking on a free space in the EQ window, you can copy and paste the EQ's settings.
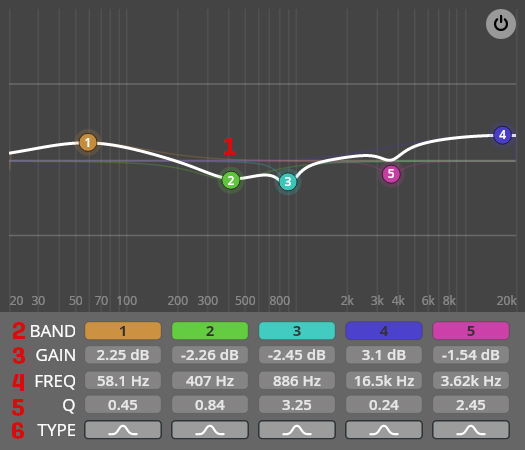
- EQ Node: Double-click the BAND nodes to activate the corresponding band, or right-click to change the filter type. Use your mousewheel to change the Q value, Alt-click to lock frequency, and Cmd/Ctrl-click to reset gain to zero.
- BAND: Activate/deactivate the filter band by clicking on the corresponding button.
- GAIN: Gain value of the selected node in the EQ display window.
- FREQ: Frequency of the selected node in the EQ display window.
- Q: Q value of the selected node in the EQ display window.
- TYPE: Click to choose from these available filter types: Peak, Low-Shelf, High-Shelf, High Cut, Low Cut, Bandpass, Notch.
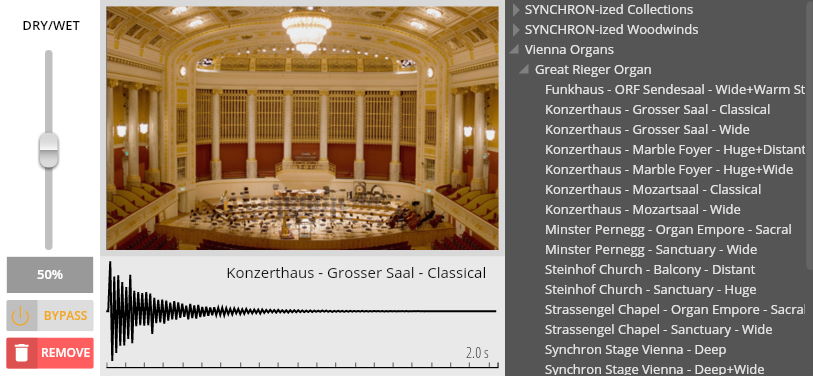
The IR button next to the SPACE value opens an impulse response window. Here you can select a suitable impulse response from the list and set its dry/wet ratio (i.e., the relation of original sound to impulse response). Please note that the IR acts independently of the space amount value. As already mentioned, there are only IRs available for the Great Rieger Organ.
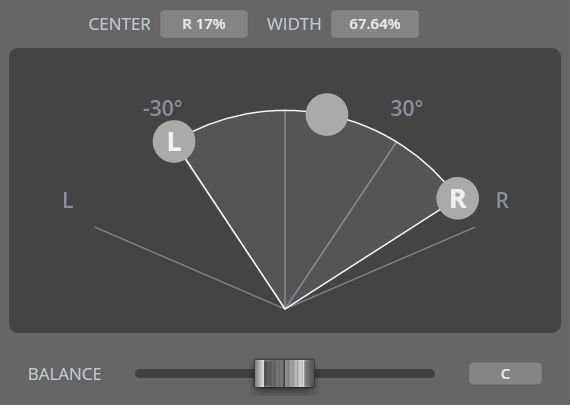
By right-clicking on a channel's pan image, you can choose between balance panning and powerpan. Open the powerpan window by double-clicking on its icon.
Global Pan Law can be adjusted in Settings => Engine.

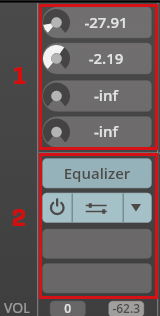
- Aux Sends: The signal strength of the 4 send channels can be adjusted between -inf (mute) and 6 dB. As with other numerical values, click-drag or double-click to edit, and Cmd/Ctrl-click to reset. The 4 sends correspond with the 4 possible return channels. This means that if there is no Aux 4 defined, changing the value of Send 4 will have no effect.
- Channel effect: These 4 slots can be used to apply insert effects of your choice to the channel. Hovering over a slot gives you the options to switch it on or off and to select an effect for that slot. Moreover, you can move effects by dragging them to another position, or copy them by Alt-dragging.
