Note
Important

- Open an existing MIR Pro project or create a new one
- Activate MIRx Mode (press Shift-x or click the respective button in the top bar of the MIR PRO user interface)

- Select a MIRx Venue
- Apply MIRx Preset settings to any number of selected MIR Pro Icons (they depend on the chosen Instrument Profile)
- Use MIRx Preset Alternatives when needed (e.g., for soloists)
- Vienna Konzerthaus / Grosser Saal (RoomPack 1 - Vienna Konzerthaus)
- Vienna Konzerthaus /Mozartsaal (RoomPack 1 - Vienna Konzerthaus
- Teldex Studio Berlin / Aufnahmesaal (RoomPack 2 - Studios & Sound Stages)
- The Sage Gateshead / Hall One (RoomPack 4 - The Sage Gateshead)
- Pernegg Monastery (RoomPack 5 - Pernegg Monastery)
- Vienna Synchron Stage
- Output Format (stereo, in all cases)
- Main Microphone selection, setup and position offset
- Secondary Microphone selection, setup, position and volume offset (relative level)
- Global Dry / Offset (actually set to 0.0 in all cases)
- Reverberation Time (actually set to 100% in all cases)
- 24 dedicated Room EQ busses with individual settings for all typical main instrument families within an orchestra.
Important

- Position, Direction, Width, Dry/Wet Ratio
- Room Equalizer assignment
- MIRx Preset Alternatives (e.g., positions such as 1st and 2nd Violins, dedicated Solo positions, or just different Characters such as "warm" or "bright")
- Position-dependent Character settings (a.k.a. "Pre-EQ" in MIRx for Vienna Instruments Pro)
Note
- When changing to another MIRx Venue within the MIRx Settings window, all relevant instrument settings are either retained or adapted to the respective Venue-specific values.
- Existing MIR Pro-based projects may be converted to MIRx Mode globally or just for selected MIR Pro Icons.
- Newly instantiated MIR Pro Icons either may adapt to MIRx Preset settings automatically, or they can be set manually one by one.

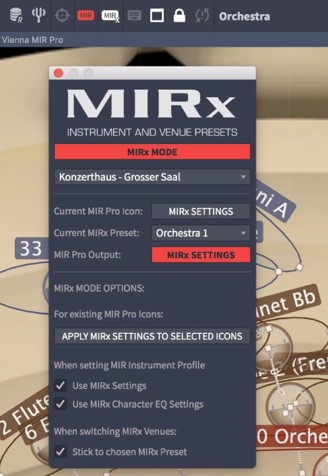
Pressing "X" on your computer's keyboard will assign MIRx Settings to the current MIR Pro Icon, too.
In most cases there is more than one typical "Orchestra" position available for a selected instrument (e.g., Violins 1 and 2, Triple Horn 1 to 4, or soloist positions at the center of the stage). These additional settings are called "MIRx Alternatives" and can be selected by using the right-click context menu directly on a MIR Pro Icon, or by using the pull-down menu in the MIRx settings window. MIRx Alternatives literally double the amount of available MIRx Presets! By default, the first "Orchestra" position and the applicable Character Preset are assigned to a MIR Pro Icon according to the selected Instrument Profile. Switching MIRx Alternatives will change the Character settings, too.MIRx Mode Options
The MIRx Mode Options accommodate a button to manually assign the MIRx Settings of the chosen Venue to all selected MIR Pro Icons. This is how existing setups and templates can be brought into MIRx Mode with just a few clicks. Just be aware that MIRx Settings always depend on the chosen MIR Pro Instrument Profile! Normally, MIR Pro will choose the proper MIRx Preset automatically for any selected MIR Pro Icon with a valid Instrument Profile as long as MIRx Mode is on. The same is true for the Character settings. There may be situations when you would like to do this on a case-by-case basis rather than completely automated - which can be achieved by switching these options off. As mentioned before, there are many cases where more than one typical "Orchestra" position is available for a selected instrument (e.g., Violins 1 and 2, Triple Horn 1 to 4, or soloist positions at the center of the stage). These additional settings are called "MIRx Alternatives" and can be selected by using the rightclick context menu directly on a MIR Pro Icon, or by using the pull-down menu in the MIRx settings window. MIR Pro will stick to the chosen MIRx Alternatives when switching Venues, unless you deactivate the respective option in the MIRx Settings window. This might be useful when you want start from a fresh perspective rather than from a previous version of a similar setup.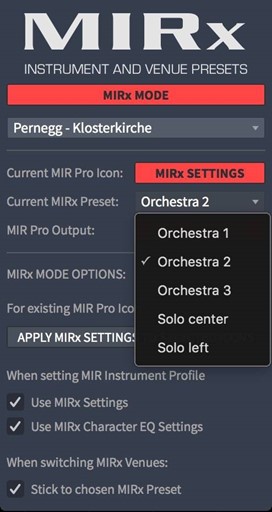
Tip


Note
Important
Tip
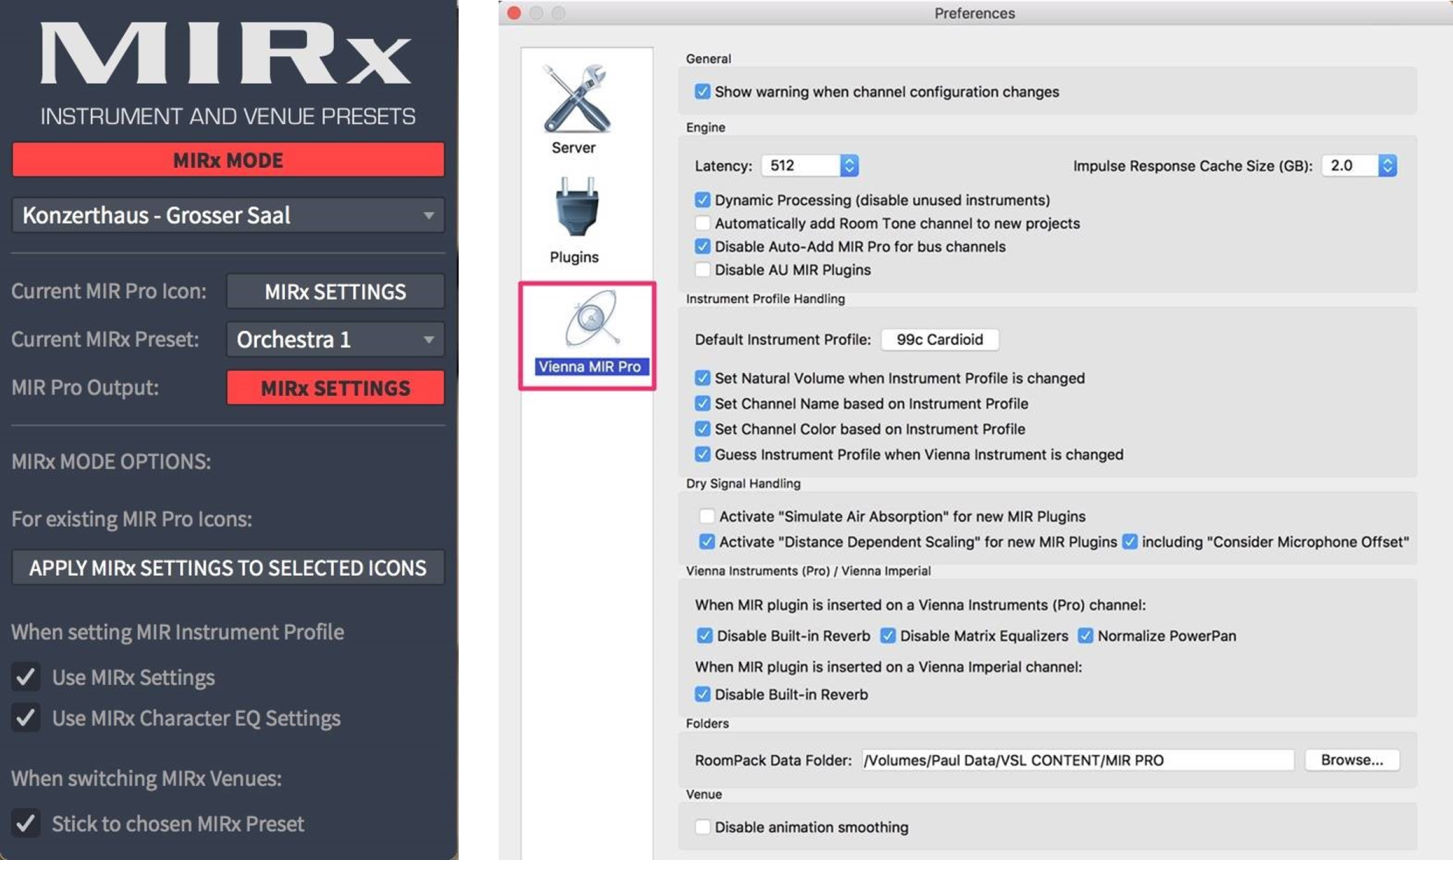
- Start a new MIR Pro project in stereo configuration (at this time, multi-channel setups are not supported by MIRx Mode)
- Add a Vienna Instrument (Pro) Player to this project; if you haven't activated the Auto-add MIR Pro function, replace the channel's Stereo Pan plug-in with MIR Pro.
- Activate MIRx Mode (...the MIRx Settings Window will open, too).
- Select the MIRx-ready Venue from the pull-down in the MIRx Settings Window (...the Output Channel's MIRx Settings button should already glow red).
- Load a Patch, Matrix or Preset into the Vienna Instrument (Pro) Player
- Provided all MIRx Mode options and MIR Pro Preferences are set as outlined above, MIR Pro will assign the proper Instrument Profile automatically. Consequently, the default MIRx Preset for the chosen Vienna Instrument patches will be loaded, too.
- Choose the MIRx Preset Alternative that fits your needs. Some Instruments have five or more individual Presets to offer! Look at the screenshots below to get the idea.
- Now keep adding Vienna Instruments until your orchestra is set up according to your needs.
- In case you want to add signal sources other than Vienna Instruments, assign the 99x - MIRx General Purpose Profile to your MIR Pro Icon manually and choose the desired MIRx Preset Alternative.

Selecting MIRx Alternatives can be done directly in the MIRx Settings window or in the rightclick context menu of the MIR Pro Icon.
The instrument shown in the screenshot offers several individual "Orchestra" positions and two solo positions close to the Main Microphone.
Note
- Add a MIR Pro Plug-In to a stereo track of your host application.
- Open MIR Pro's Main Window.
- Activate MIRx Mode (...the MIRx Settings Window will open, too).
- Select the MIRx-ready Venue from the pull-down in the MIRx Settings Window (...the Output Channel's MIRx Settings button should already glow red).
- Select the MIR Pro Icon and assign the desired Instrument Profile (please see MIR Pro Manual for details).
- Provided all MIRx Mode Options and MIR Pro Preferences are set as outlined above, the default MIRx Preset for the selected Vienna Instrument patches will be loaded, too.
- Choose the MIRx Preset Alternative that fits your needs. (...see the screenshots for Example 1A).
- Keep adding MIR Pro Plug-Ins to other channels in your DAW until your orchestra is set up according to your needs.
- In case you want to add signals derived from other sources than Vienna Instruments, assign the 99x - MIRx General Purpose Profile to your MIR Pro Icon and choose the desired MIRx Preset Alternative.
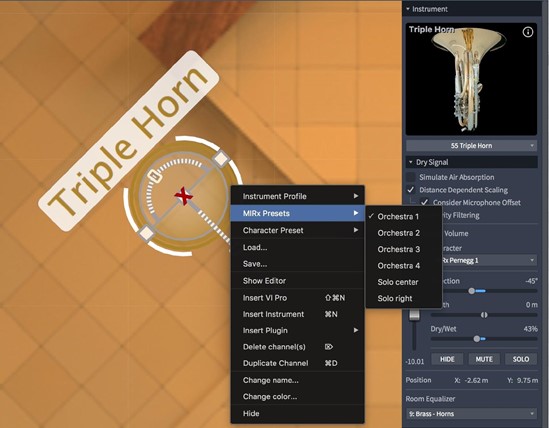
Selecting MIRx Alternatives from the right-click context menu of the MIR Pro Icon. Please keep in mind that the Character Presets differ for each position, too!
Important
- Open a MIR Pro project you created earlier.
- Open MIR Pro's Main Window.
- Activate MIRx Mode (...the MIRx Settings Window will open, too).
- Select the MIRx-ready Venue from the pull-down menu in the MIRx Settings Window (...the Output Channel's MIRx Settings button should be lit red now).
- Select all Instruments / MIR Pro Icons you want to change to MIRx settings.
- Click the button labeled "APPLY MIRx SETTINGS TO SELECTED ICONS".
- Select individual Instruments / MIR Pro Icons.
- Choose the MIRx Preset Alternatives that fit your needs (...see the screenshots for Example 1A and 1B).

Important

Important
Note
The Room EQ slot shown in the Output Channel's EQ windows will be in sync with the Icon/Instrument displayed in the Instrument Channel, unless another slot is selected in the Output Channel's Room EQ pull-down.
Please take a look at the screenshot on the following page:
The Room EQ's main window allows you to select any of the slots for detailed editing using the arrow buttons near the top. Providing a meaningful name right below the slot's number will make proper assignments and navigation considerably easier. This is the name that will also appear in the respective line of the pull-down menu in the Output Channel.
Complete collections of Room Eqs can be saved and loaded with the Load Bank/Save Bank buttons in the upper menu bar. Individual Room EQ settings can be saved and recalled at a later point by using the Load/Save buttons in the lower menu bar. Bypass and Reset functions are handled in a similar way for the whole bank as well as for individual slots.

Using Room EQ Banks
While it might be neither necessary nor feasible for every project to use 32 different EQ settings for the wet signals derived from MIR Pro, it can make all the difference to have three or four fine-tuned EQ curves for, e.g., strings, brass, woodwinds and percussion instruments.
Another typical approach sports special processing for bassheavy instruments, for vocals, or for any other kind of signals with special acoustic requirements.
For small adjustments it's a good idea to save an existing EQ curve, and to recall it after changing to the next unused slot. Don't forget to change the name to avoid confusion, though.
Note
Projects without Room EQ assignments and from previous versions of MIR Pro will always default to slot 0.
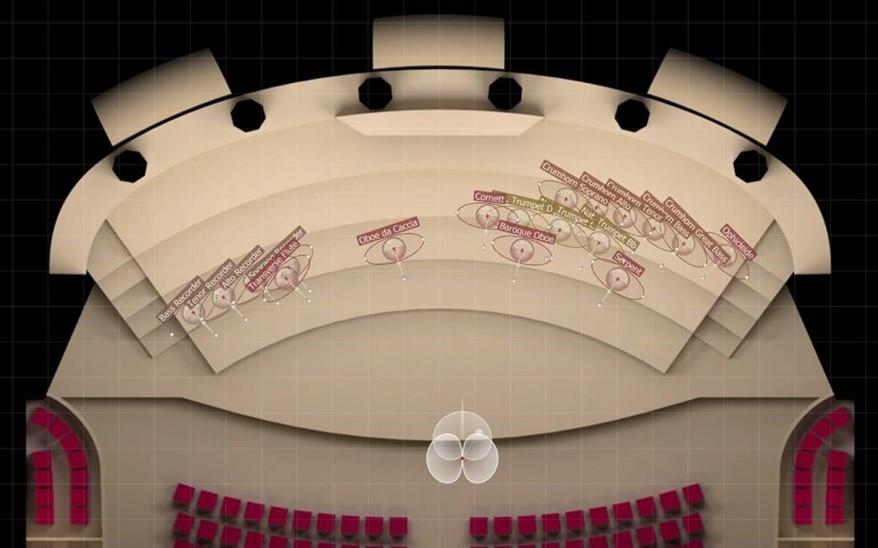
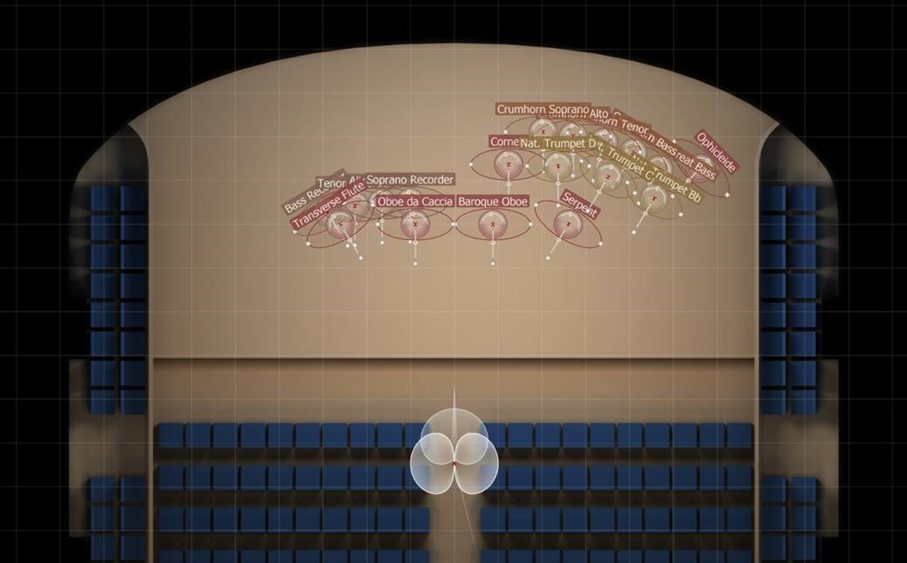
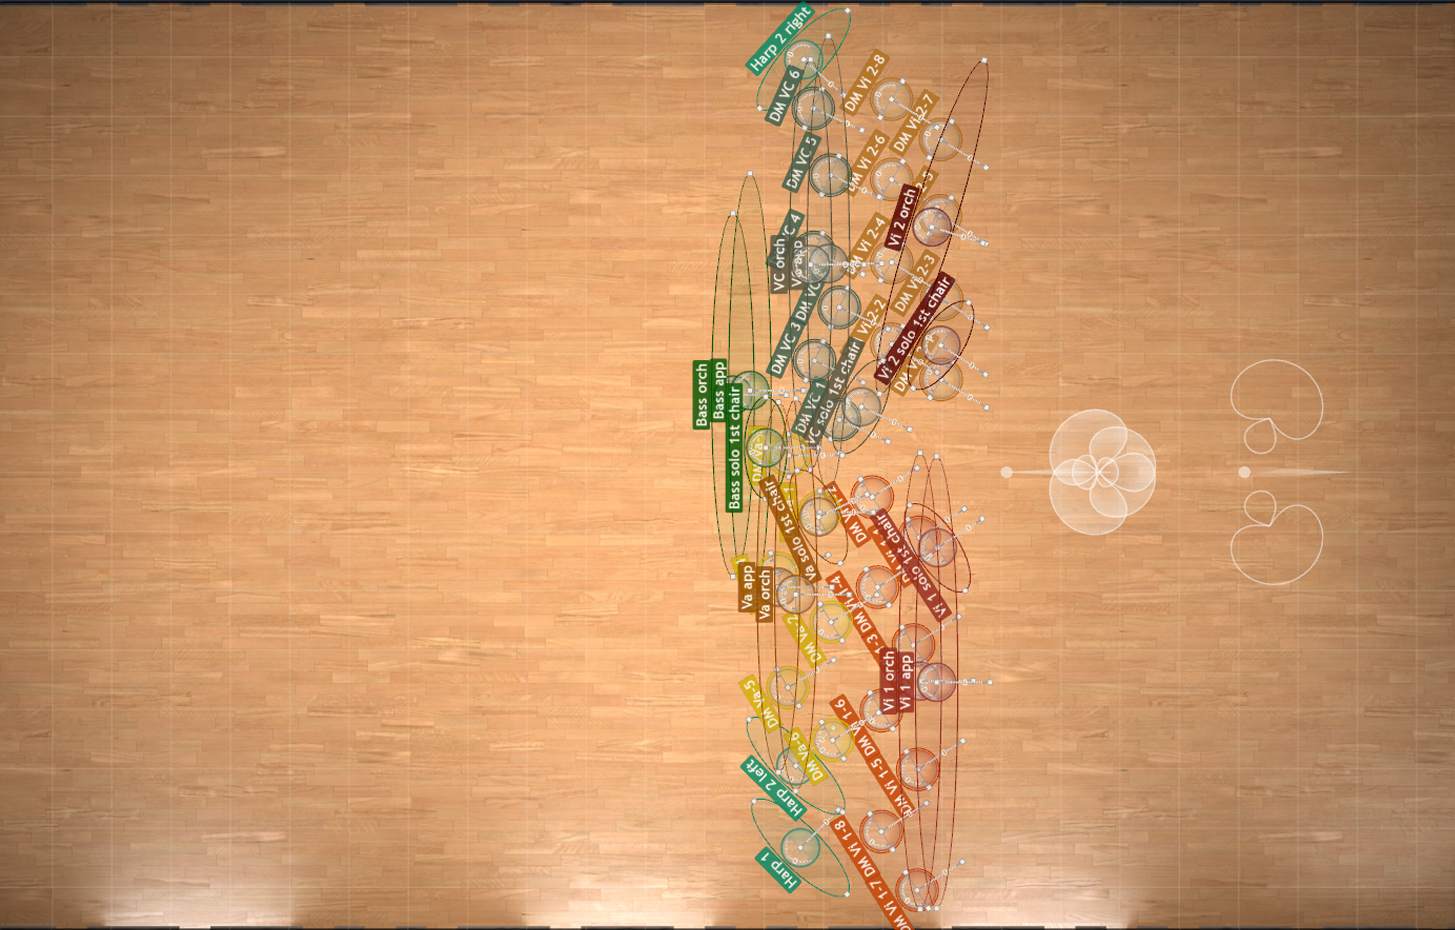
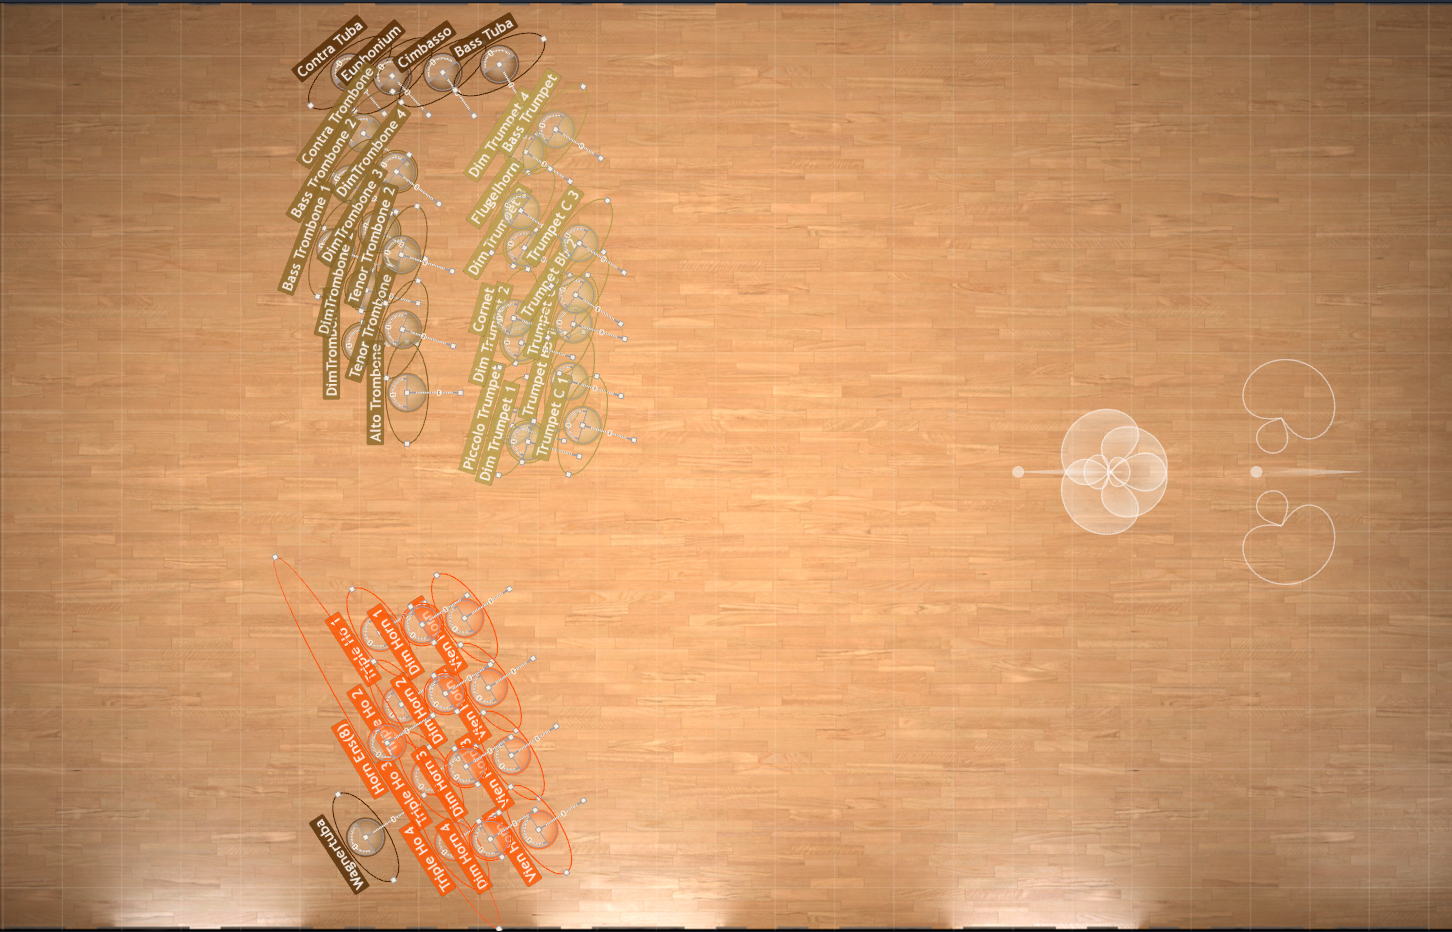
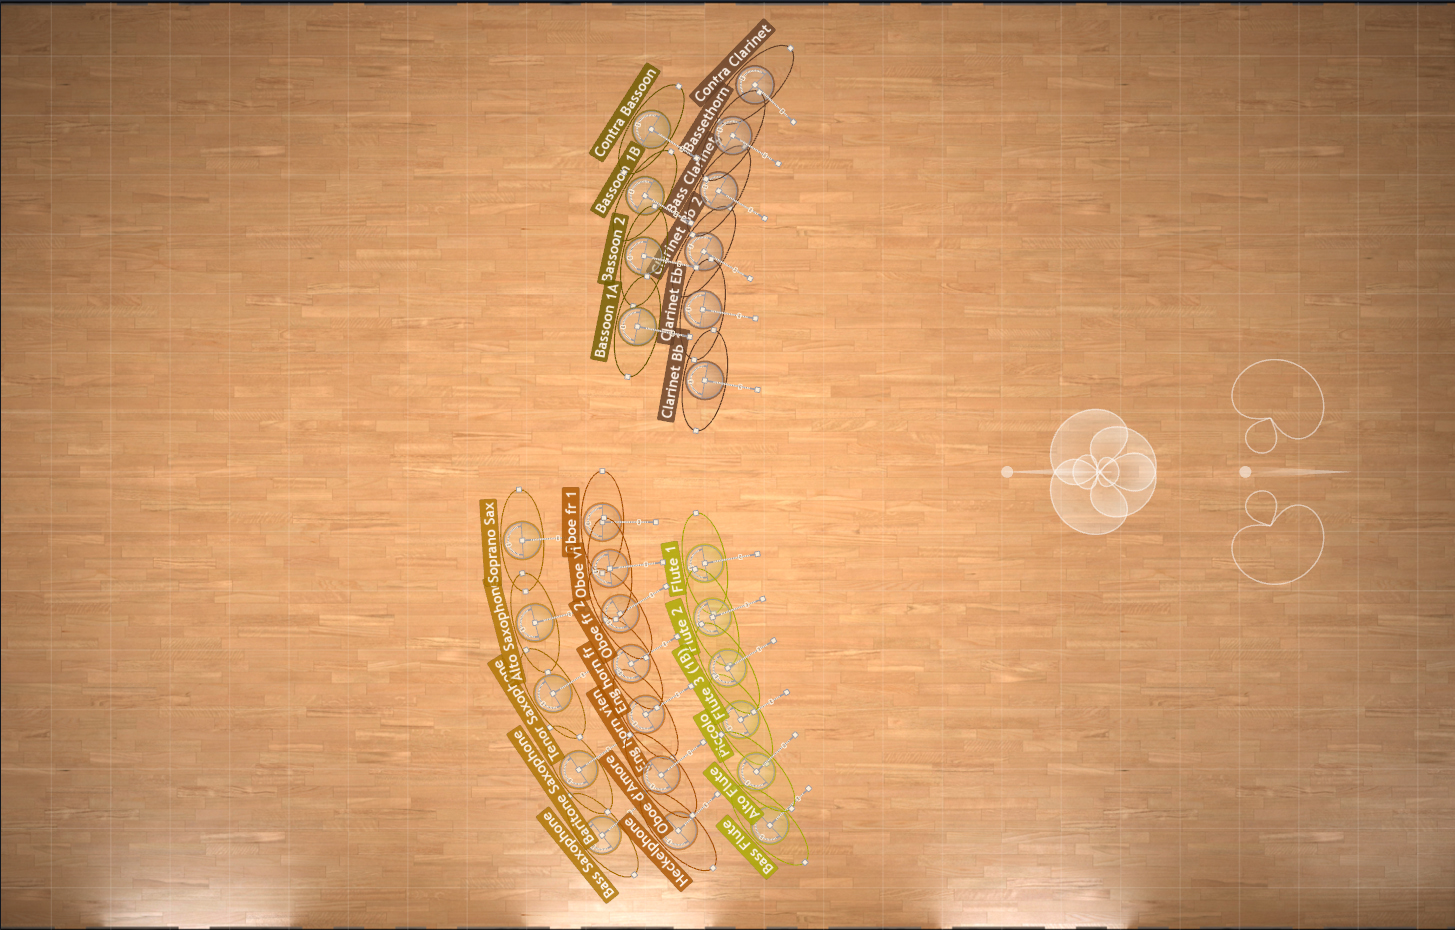
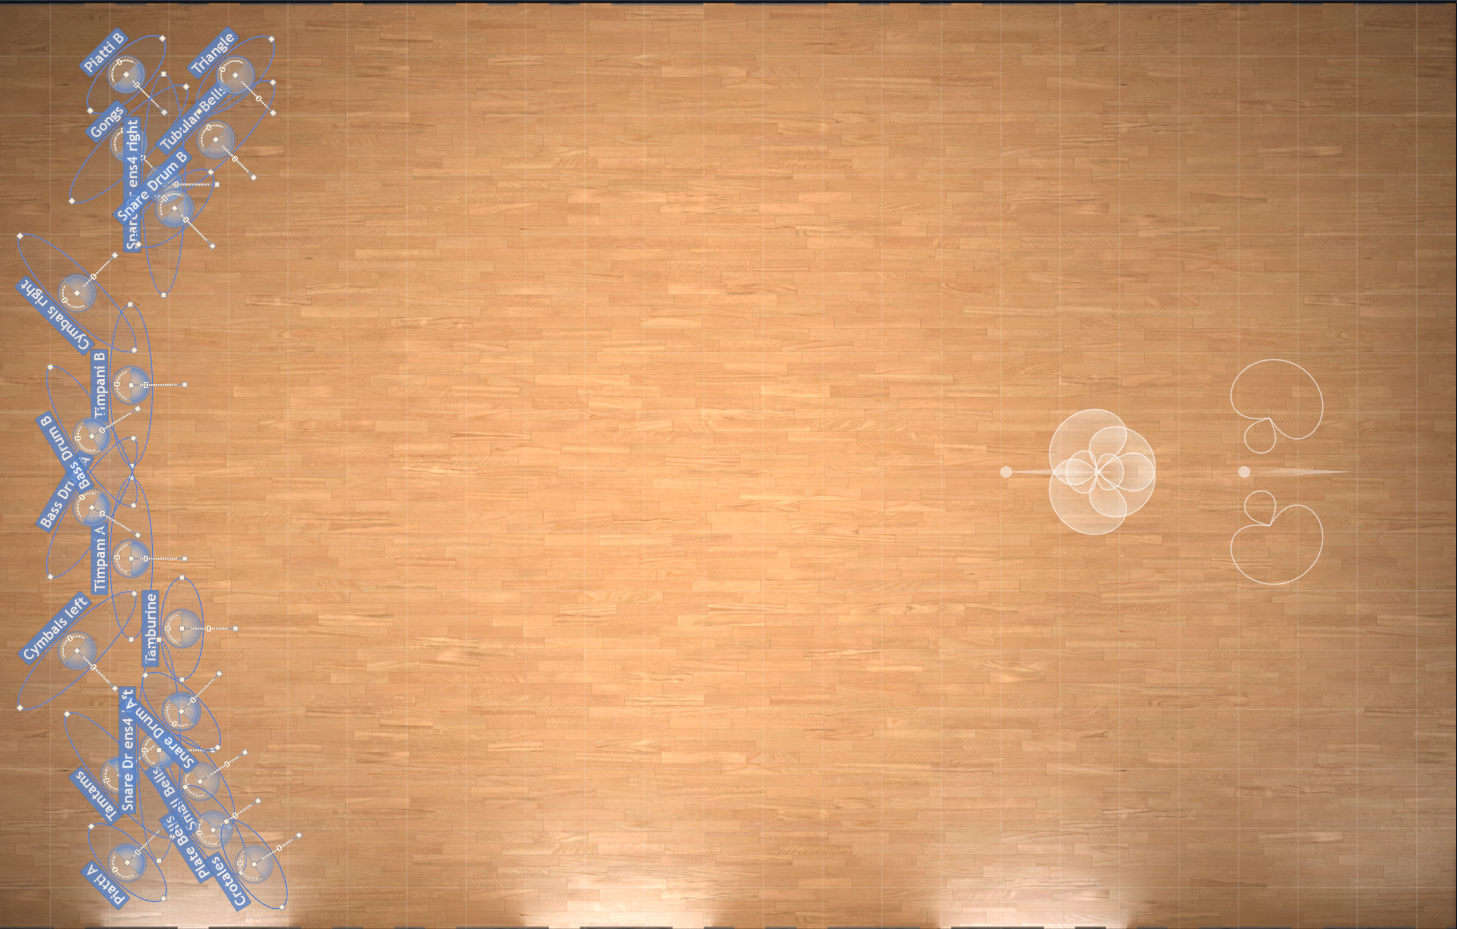
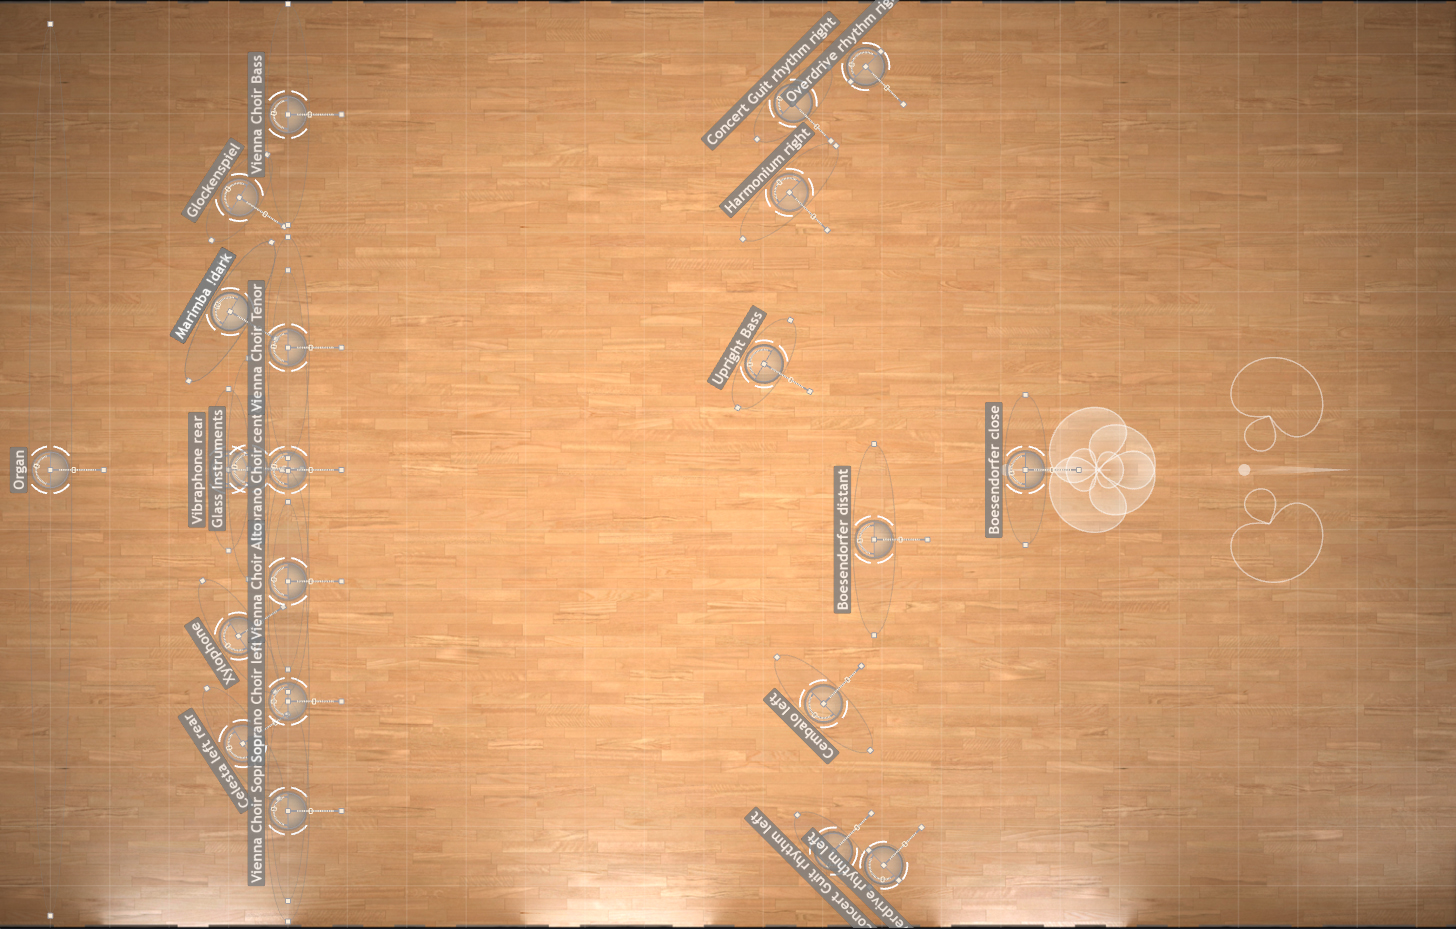
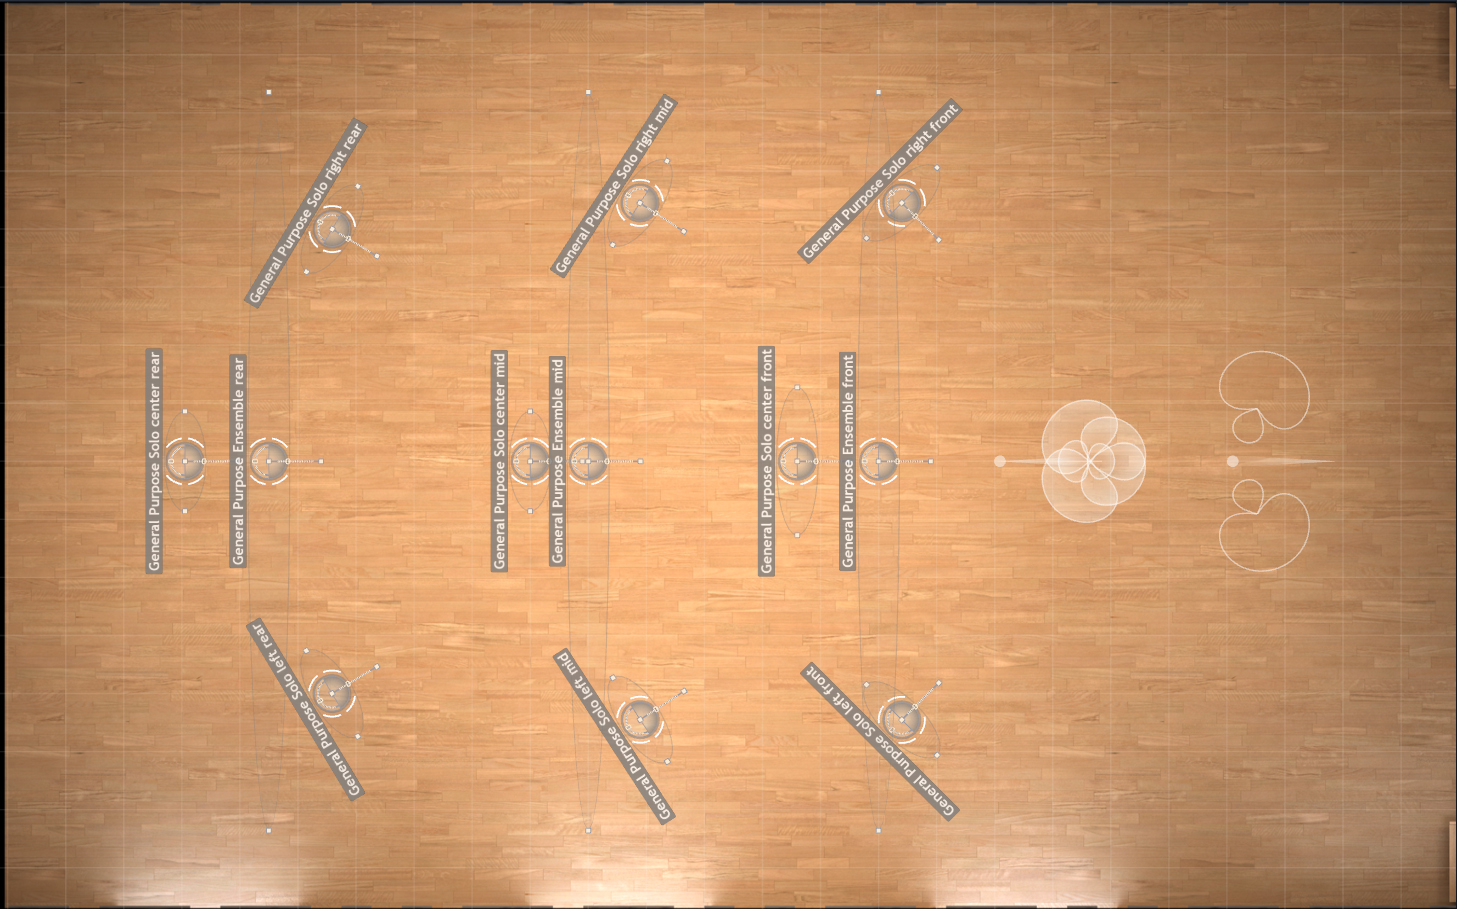
- Each MIR PRO icon represents one virtual instrument.
- The MIR PRO icon provides information about direction, stereo width and placement of each instrument.
- You can see the main microphone positioned in front of the virtual orchestra.
- You will see a few unusual positions as well - that's simply because the instrument might actually sound best in a specific hall when the player is NOT looking straight at the conductor!








On this page
- What it is
- How to get hold of it
- How to use MIRx Mode
- Good to know
- 1. Venue related settings
- 2. Instrument related settingsProfile)
- 3. Global MIRx Mode features
- GUI elements and options
- The MIRx Mode On/Off-button
- The MIRx Settings Window
- 3. MIRx Settings Indicators on the MIR Pro Venue Map
- How to use
- Example 1A: Creating a new MIR Pro setup using MIRx Mode in Vienna Ensemble Pro
- Example 1B: Creating a new MIR Pro setup using MIRx Mode in your Digital Audio Workstation (DAW)
- Example 2: Converting an existing MIR Pro setup to MIRx Mode
- Example 3: Using MIRx Presets for own creations
- Room EQ bank assignment and usage
- MIRx Settings - Overview
- Konzerthaus Grosser Saal
- Konzerthaus Mozartsaal
- The Sage Gateshead Hall One
- Teldex Studio Berlin
- Pernegg Monastery