The Auto Playback and Pattern Sequencer introduced in Vienna Instruments PRO 2 opens up a new playground with many unique features: Color coded articulation display, musical phrases that stay in their harmonic environment, rhythmic patterns and advanced arpeggios, it's all there – and of course you are sync'ed to your host tempo, if you like!
To activate the Sequencer, click "On" right next to the Sequencer button in the Matrix Control section. The sequence names will show up in the Y-Axis of the Matrix View (see below). You can rename those in the Sequencer View later on. To switch to the Sequencer View, click Sequencer in the Matrix Control section or click the Sequencer icon to the left of the Basic/Advanced View, as shown below.

Tip
You may now load a Matrix and keep the sequence of the current Matrix intact by pressing SHIFT while dragging the Matrix into the Matrix list.Merge Sequences by holding SHIFT when pressing import/load.
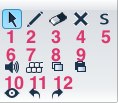
- Arrow: Enables "normal" selection mode.
- Pen: Enables drawing mode for note creation. Holding down Alt key while clicking in the sequence editor also enables drawing mode.
- Eraser: Enables erase mode for deleting notes.
- Mute: Enables mute mode for muting/unmuting notes.
- Solo: Enables Solo mode for soloing notes.
- Speaker: Speaker mode will automatically playback selected notes and keypresses on the sequencer keyboard.
- Keyboard: Activating keyboard mode will allow plugin to grab keyboard input, so keyboard shortcuts can be used.
- Copy: Copy selected note(s) to clipboard.
- Paste: Paste selected note(s) from clipboard.
When pasting, a marker will occur which allows to select place for pasting. - Visibility: Pressing the visibility button will hide all non-selected notes in a sequence.
A second press on visibility when already activated, will return sequence to full visibility. - Undo: Undo last note operation.
- Redo: Redo last undone note operation.
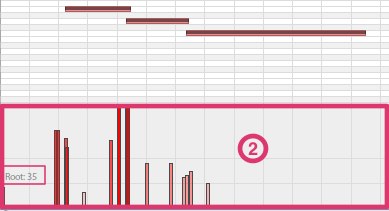
- Draw:
- Drawing with mouse in the velocity editor will apply desired velocities to the selected note(s).
- If no notes are selected, all notes in sequence will be edited.
- Shift-draw will apply a uniform value to all notes.
- Alt-draw will allow for a line to be defined, that will apply a smooth transition of velocity values to selected note(s).
- Display:
- Red bars represent note velocity. Taller bars (with darker red color) represent higher velocities.
- A line representing the root velocity is drawn.
- Sequence root velocity is displayed to the left.

Open: Click to open a sequence file
*.viseqSave: Click to save current sequence to file
*.viseqImport: Click to import midi file to current sequence.
Clone:
- Activate clone mode for selected sequence.
- Clicking this button on the master (first) sequence, will toggle cloning on/off for all slave sequences (2-8).
- A cloned sequence can be identified by the "lock" icon next to the sequence name.
Tip
Interesting: If a different starting note is already available in one of the sequences when auto-cloning, the sequence from seq1 will be transposed...
- Loop:
- Toggle looping on/off for sequence.
- When looping is on, PlayToEnd option will be disabled.
- Host Tempo Sync:
- Locks sequence tempo to host clock.
- With this option enabled, Sequence BPM setting will be disabled.
- Drum Mode:
- Makes sequence always trigger at root key (no matter which key is triggered).
- Useful for percussion or drum sequences (loops).
- Play To End:
- Makes sequence always play to its end, even when trigger key is released during playback.
- When "PlayToEnd" is active, looping will be disabled.
Sync To Host Beat: Makes sequence always trigger on a host beat.
Polyphonic Sync: Synchronizes playback pointer of individually triggered sequences.
Root Key:
- Sets the root key for sequence.
- If sequence is triggered at root key, sequence will play back untransposed.
- Root Vel:
- Sets the root velocity for sequence.
- A sequence triggered at root velocity, all notes of the sequence will play back with velocities as written.
- BPM:
- Sets the sequence tempo.
- When the "Host Tempo Sync" button is activated, this setting will be disabled.

- Written in:
- Describes the root key and scale type for sequence.
- If your sequence was written in E major, VI PRO now knows which notes you have used.
- Root key setting is mirrored on Sequence Tab.
- All factory presets and matrices with sequences were written in C major.
- Perform in:
- Sets the key and scale of sequence playback.
- While your sequence was, e.g., written in E major, you can now pick ANY other scale you want to actually play on your keyboard. Your sequence will be transposed accordingly. Remember that the notes you trigger should be within the scale you selected as the performance scale (e.g., B minor).
- Sequencer will intelligently transpose the written notes to the chosen key/scale.
- Scale Select Range: on/off:
- Turns on/off Scale Select Range feature.
- Feature allows for a range of keys to control which key the "perform scale" will be in.
- Scale Select Range: From:
- Sets start of scale select key range.
- The note assignment is not transposed. A "C" will always trigger a scale in "C", a "D" will always trigger a scale in "D", no matter which range was defined in the Scale Select Range.
- Scale Select Range: To:
- Sets end of scale select key range.
- Scale Select Range: Sync Scale Settings:
- Links scale range settings for an entire matrix.
- Velocity Switch: on/off:
- Enables velocity-dependent switching of scale type.
- Velocity Switch: Regions:
- Sets number of active velocity switch regions for scale type selection by click-dragging the mouse over the displayed number.
- If you are using "just" 2 scale types (e.g., major and minor harmonic), you will only need 2 regions.
- Velocity Switch: Settings:
- Shows the "Velocity Range Setup" settings.
- Use the From/To fields to set the velocity range to trigger a certain scale on the keys in the Scale Select Range (see above).
- Use the third field to set the scale type to be triggered by the defined range.
- By default (---), range will not trigger any change in scale type.

- Auto-X:
- Applies the selected X-axis a to selected notes. When playing back a sequence with notes set to default (light blue), these notes will playback the articulations based on the X-Axis controller position.
- Cell Row:
- Applies chosen cell to selected notes.
- Right click to apply default cell (same as choosing Auto-X cell).
- Slot Mask:
- Assigns specific slot to selected note(s).
- Dark blue means slot will be triggered, white means not triggered.
Alt-clickon a slot to assign only this slot to selected note(s).Shift-clickon a slot to select all notes which have this slot assigned.Ctrl-clickon a slot to reset slot mask and assign all slots to selected note(s).

- Tempo adjustment buttons:
- Adjusts tempo (or length) of selected notes.
- Double/Half
- Triplets (+inv)
- Quintuplets (+inv)
- Septuplets (+inv)
Q: Performs a hard quantize of selected notes to grid.
Q-end: Quantizes ends of selected notes to grid.
Q-iter: Quantizes selected note(s) to grid, with selected Q-strength.
Q-strength: Sets strength of iterative quantize.
Split: Splits selected notes on the grid lines.
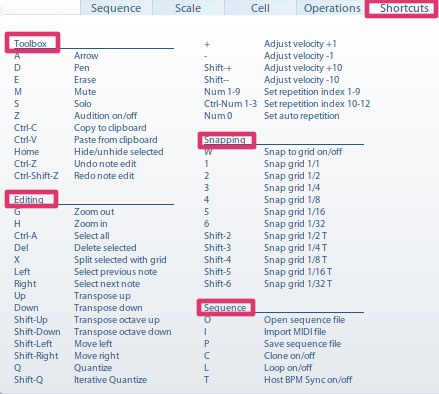
Lists all available APP Sequencer shortcuts for Windows and OS X (depending on the OS, here it is Windows).

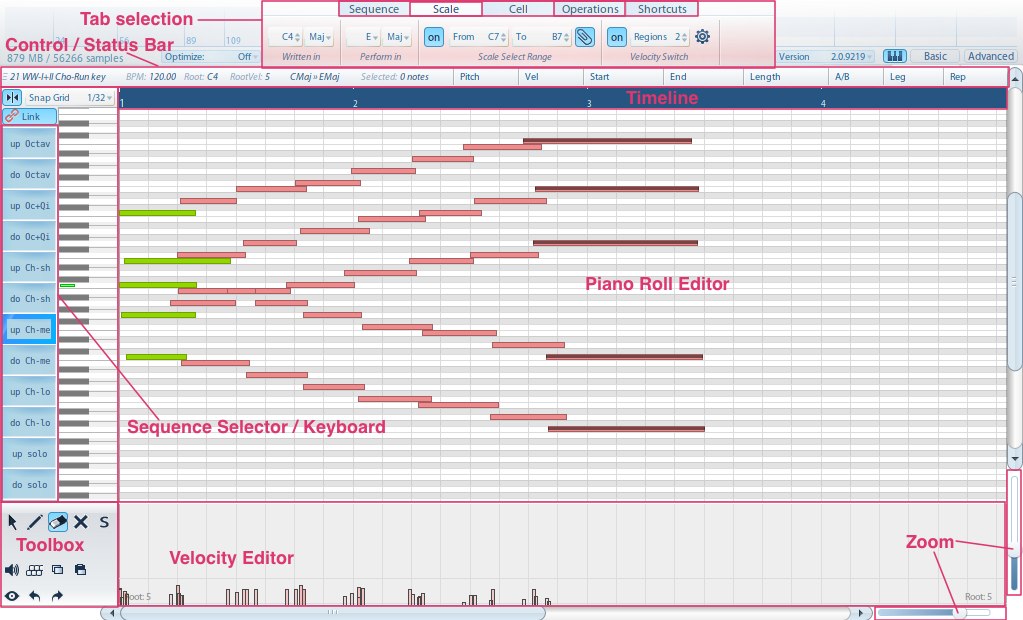
- Status Area:
- Displays information about current sequence
- Matrix name
- BPM
- Root key
- Root Velocity
- Written in scale > Perform in scale
- Selected notes
Pitch: Adjust pitch of selected note(s).
Vel: Adjust velocity of selected note(s).
Start: Sets start position of selected note. When several notes are selected, first note starting point will be set to desired value while other notes will keep their relative offset.
End: Adjusts end position of selected note(s). When several notes are selected, first note end position is displayed.
Length: Adjusts length of selected note(s).
A/B: Forces selected note(s) to specific A/B controller.
Leg:
- Forces selected note to specific legato offset (legato transitions for different intervals, from -12 to 12). Legato offsets are visualized by lines drawn before note starting position. These indicate which note the assigned transition was coming from. Portamento Patches make this system quite clear.
- The benefit is to receive more options for note transitions.
- Rep: Forces selected note(s) to specific repetition index (up to 9 repetitions). Repetition index is shown as a number at the start of a note.
Snap Grid on/off: Enables/disables snap grid. New notes will be placed according to the grid devision.
Snap Grid: Sets the snapping grid division of the pianoroll editor and timeline.
Timeline:
- Shows beats/bars numbers and divisions.
- Right-click and drag to define a loop.
- Ctrl-click and drag to edit loop start point.
- Alt-click and drag to edit loop end point.
- Click-drag on start/end point triangles to edit loop.
- Loop points will follow snap settings.
- Right-click outside the loop to remove the loop.
- Double-click to select all notes of the sequence.


Link: When activated, all cells of the matrix share the same Sequence and Scale settings, the corresponding tabs are underlaid in red.
Sequence Selector: Selects current sequence. The number of available sequences is always the same as matrix height (Y-Axis).
Sequence name will be shown in the sequence selector, as well as in the matrix view on Basic/Advanced pages.Rename: Edits the name of the selected sequence
Copy: Copies sequence to clipboard.
Paste Articulations: Pastes articulations into the selected sequence cell.
Paste Notes: Pastes notes into the selected sequence cell.
Paste Sequence: Pastes the complete sequence into the selected sequence cell.
