

One Preset can consist of up to 127 Matrices that can be accessed by Key Switches, program changes. The Matrix View displays the currently selected Matrix and can contain up to 12x12 Cells.
- Matrix Strip:
- Set current matrix by clicking on a matrix strip.
- Drag & drop strip into matrix list to reorder.
- To load a strip from a saved matrix, drag matrix from browser onto strip.
- Double-click matrix in browser to replace current matrix.
- Key Switch:
- Click-drag to set value.
- Double-click to edit, enter to accept.
- Right-click to enable MIDI-learn.
- Right-click several boxes to enable consecutive MIDI-learn.
Matrix Name: Double-Click to edit Matrix name.
Strip volume:
- Click-drag to adjust value.
- Double-click to edit, enter to accept.
Output: Click to select matrix output assignment.
Add: Adds a new matrix at the end of the list.
Copy: Copies current matrix and inserts it after current matrix.
Clear: Clears all settings from current matrix
Delete:
- Deletes current matrix.
- If only one matrix remains, deleting this will result in clearing (minimum of one matrix must exist).
Auto-Scroll: Automatically scrolls matrix list to currently active matrix.
KeySw/PrgCh: Toggles display of Program Change number or Key Switch assignment.
MIDI Dump (also see ADVANCED View, centered below Matrix: Click MIDI DUMP and the current Matrix Selection, Cell Position, A/B Position, Sequencer Root Key of the selected Vienna Instruments PRO Interface will be dumped to the record-enabled track in your sequencer as MIDI information.
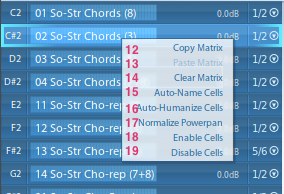
Copy Matrix: Copies selected matrix.
Paste Matrix: Pastes a copied matrix to current.
Clear Matrix: Clears selected Matrix
Auto-Name Cells: Tries to automatically name all cells and slots of a matrix according to defaults
Auto-Humanize Cells: Automatically assigns default humanization presets to all cells/slots of matrix.
Normalize Powerpan: Scales powerpan settings for entire matrix. Resulting powerpan settings will be spread.
Enable Cells: Enables all cells of matrix (loads all samples).
Disable Cells: Disables all cells of matrix (unloads all samples).
Matrix View:
- Resize matrix by dragging borders or corners.
- Resize operation that would cause loaded cells to be deleted produces verification dialog.
- Dragging & dropping a matrix from browser onto matrix area will replace current matrix with the dragged one.
- Drag & drop a patch from browser onto cell to load into Slot 1a.
- Drag & drop a patch from browser into cell while pressing keys
1-8will load patch in slot marked by numbers on GUI (displayed in Advanced View). - When in sequence mode, and sequences have been assigned a dedicated name, these names will be shown to the left of matrix.
- Matrix Cell:
- Ctrl-drag or Shift-drag cell to another cell to copy.
- Alt-drag cell to another cell to switch cells.
- Double-click on a cell toggles enable/disable. Cell will display red if it contains patches which could not be found.
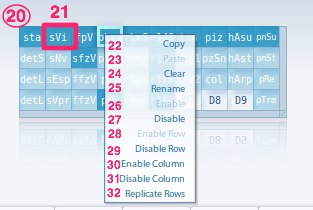
Copy: Copies selected cell.
Paste: Pastes a selected cell to current.
Clear: Clears selected cell.
Rename: Sets a custom name for cell.
Enable: Enables the selected cell
Disable: Disables the selected cell
Enable Row: Enables the row of the selected cell
Disable Row: Disables the row of the selected cell
Enable Column: Enables the column of the selected cell
Disable Column: Disables the column of the selected cell
Replicate Rows: Replicates the first row of cells to all other rows
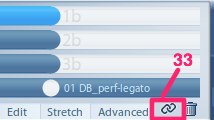
- Patch Link (also see "Slot Rack"): Activating the Patch Link will link editing of all slot parameters with the identical patch name. Similarly, replacing a patch when "Patch Link" is activated, and also will replace the patch in all occurences throughout the instrument.
Tip
If you accidentally loaded the wrong file, simply interrupt the loading process by loading a different, smaller patch, matrix or preset (it has to be the same file format)!
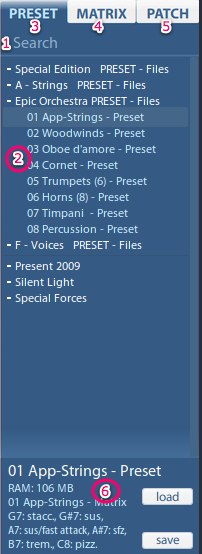
- Search:
- Search for presets, matrices, or patches by clicking the search box and typing.
- Search results will appear in real-time.
- Search will look in folder names and preset/matrix/patch names.
- Browser:
- Click-drag anywhere vertically to "drag" list for iPhone-type scrolling.
- Click-drag scrollbar to scroll list normally.
- Use mouse-wheel to scroll.
- Browser [Preset]:
- Drag & drop preset into main area to load.
- Double-click preset to load.
- Currently loaded preset displays in green color.
- Press "save" to save current preset, edit name if you wish to save to new preset.
- Press load to load selected preset.
- Press delete to delete selected preset.
- Factory presets may not be deleted.
- Hold down
Altwhile dropping/double-clicking will load presets with all cells disabled.
- Browser [Matrix]:
- Drag & drop matrix into matrix slot or matrix area to load.
- Double-click matrix to replace the matrix in the selected matrix strip.
- Press "save" to save current matrix, edit name if you wish to save to new matrix.
- Press load to load selected matrix.
- Press delete to delete selected matrix.
- Factory matrices may not be deleted.
- Hold down
Altwhile dropping/double-clicking will load matrix with all cells disabled.
- Browser [Patch]:
- Drag & drop patches into cell or slots to load.
- Holding keys
1-8while dropping patch into cell will load correspondingly marked slot. This is displayed in the Advanced View.
- Information Window:
- Displays the saved information of the respective preset, matrix or patch.
- Load/Save/Delete Buttons. Only customized files can be deleted.
Overview:
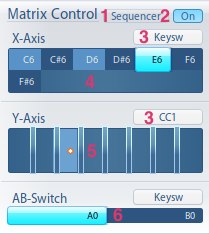
X-Axis Controllers:
Y-Axis Controllers:
Sequencer: Switches to sequencer view
Sequencer On/Off: Toggles sequencer mode on/off
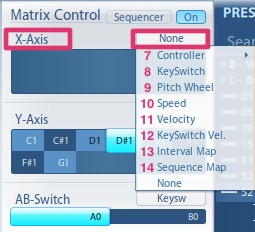
Control menu: Sets controller type for corresponding axis / AB control.
Control Bar (X-Axis): Shows different controls depending on control menu setting.
Control Bar (Y-Axis): Shows different controls depending on control menu setting.
Control Bar (AB): Shows different controls depending on control menu setting.
Control Change:
- Corresponding control bar will show range controls for the selected Control Change number.
- Click & drag a range handle to adjust its value.
- Key Switch:
- Control bar shows the active Key Switches.
- Click-drag to change all subsequent Key Switches.
- Click-drag with
Altkey to only change current Key Switch value. - Double-click to edit, enter to accept.
- Pitch Wheel:
- Use MIDI pitch wheel for controlling axis.
- Control bar shows range controls.
- Speed:
- Uses playing speed for controlling axis.
- Control bar shows range controls.
- Velocity:
- Use MIDI note-on velocity for controlling axis.
- Control bar shows range controls.
- Key Switch Velocity:

- Only available if opposite axis is set to Key Switch.
- Uses velocity of corresponding Key Switch to control axis.
- Control bar shows range controls.
- Interval Map:

- Uses note interval direction to control axis.
- Intervals mapped on matrix as 0, 1, -1 (same note, upwards, downwards)
- Control bar shows Reset Threshold control.
- Adjust reset threshold to set time after note-off, when matrix should return to first cell (interval 0).
- Maximum of cells: 3
- Sequence Map:

- Uses play sequence to control axis.
- In a matrix that contains empty cells, sequence will skip the unloaded slots and continue to next loaded slot.
- Control Bar shows chord and reset threshold controls.
- Adjust Chord threshold to enable chord playing, triggering only one sequence step.
- Adjust high threshold to set time after note-off, when matrix should return to first cell.
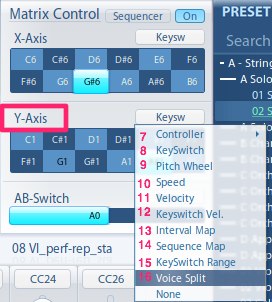
- Keyswitch Range:
- Instead of a simple Keyswitch, you can assign a range of keys which will correspond with a row in the Y-Axis
- So instead of setting C0,D0,E0 for Keyswitches, you can set for instance C0-B0, C1-B1, C2-B2, thus assigning different articulations to different key ranges
Tip
Combine the Keyswitch Range with the APP sequencer in Drum mode for creating drum grooves, or combining with slot transpose features for building up a playable setup with different articulations spread over the keyboard.
- Voice Split:
- Only available if sequencer mode is activated.
- Available in Y-Axis only.
- Splits played notes to first "free" sequence.
- Auto Voicing is not available when using Voice Split.