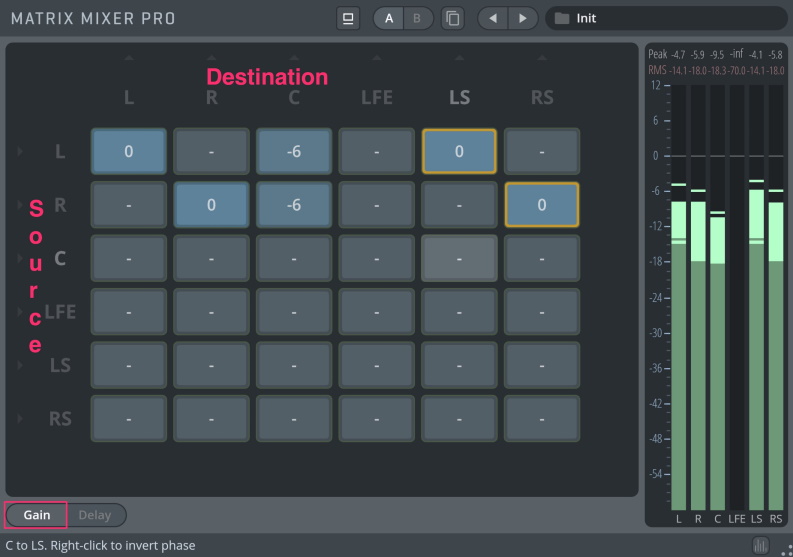
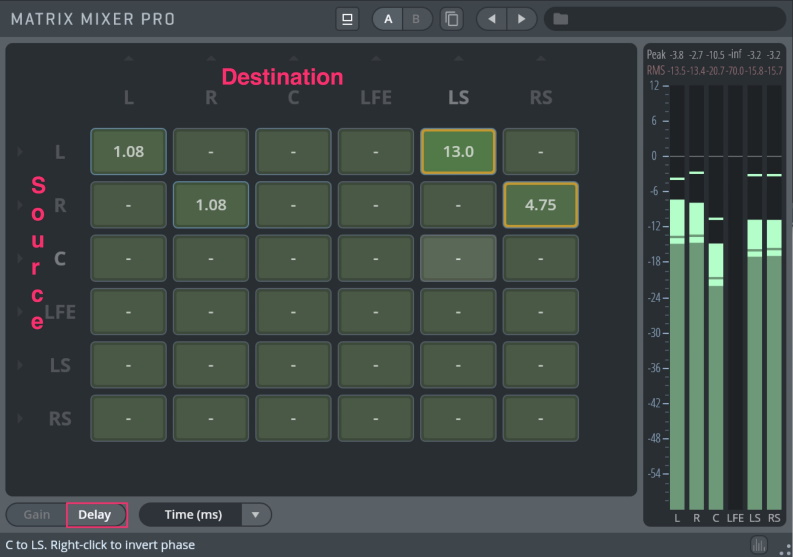
The Matrix Mixer Pro features a gain, delay, and phase network which allows you to solve a variety of problems, for example:
Feeding Left/Right channel into LFE channel
Phase adjustment of a single channel in a surround setup
Delay individual channels in a surround setup
Solving phase problems of individual channels
In Gain Mode, the matrix displays gain settings for each source-destination channel feed.

Gain adjustment: Adjust gain for each feed by click-dragging on the node. Double-click on a node to enter a value from the keyboard. Values: infinite to 12 dB.
Phase reverse: By right-clicking on a node, this node will be phase reversed. Nodes with active phase reversal are marked by an orange ring. You may, for instance, send a phase-reversed feed from the left channel to the right surround channel, and a phase-reversed feed from the right channel to the left surround channel in order to create certain effects, or "pseudo-surround". In Delay Mode, each node displays a delay for the individual feed. The delay mode allows you to set an individual delay for each matrix node, enabling very complex mixing.

Delay adjustment: Adjust the delay time for each feed by click-dragging on the node. Double-click on a node to enter a value from the keyboard. Delay mode: Choose to display delay values by Time (ms), Distance (m), or Samples.
Switching back to Gain mode after applying delay settings to a node will show a green frame around the affected node, signifying an active delay value.
Phase reverse: As in Gain mode, right-clicking on a node will phase-reverse it. Nodes with active phase reversal are marked by an orange ring.
If you hover over an element of the plug-in suite with your mouse, you will see a short explanation and practical tips in the lower left corner, so that you can start exploring these plug-ins right away.
Full Preset Names will also be displayed here when you hover over a preset name in the Preset Browser.
All plug-ins share some operational features. Here’s a description of these common controls:
Ctrl + Click (Windows), Command + Click (macOS) resets the selected control to its default value. Pressing Shift while dragging a control increases its resolution for fine-tuning adjustments. Double-clicking on a control allows you to enter a numerical value using the computer keyboard.
Important
Plug-ins are only guaranteed to work at a host sampling rate of 44,100 Hz and higher. If the rate is set to, e.g., 22,050 or 33,000 Hz, plug-ins may perform improperly or in a limited way.
The Factory Presets option lets you select one of the pre-configured settings for the plug-in, many of which are specifically adapted for Vienna Instruments (especially in Equalizer Pro and Compressor Pro ). You can Load and Save your User Presets on your computer and exchange them with other users of Vienna Suite. Make sure to back up your custom user presets regularly – you don’t want to lose them … The default path for the Preset Folder is:
Windows:
%appdata%/VSL/[PluginName]/PresetsmacOS:
[Macintosh HD]/Users/[YourName]/Library/Application Support/VSL/[PluginName]/Presets
[Macintosh HD] is the name of the hard disk the operating system is installed on. Please note that on Macs the User Library folder is hidden by default. You may un-hide it by using the Finder menu command View>Show View Options, selecting the option "Show Library Folder".
Toggle Bypass (A): Bypasses plug-in.
A/B (B): Provides quick-store of settings, to compare two different settings comfortably.
Copy State Button (C): Copies current state to the inactive A/B state.
Arrows (D): Use the arrows above the browser to step through the presets.
Folder Button: Opens the Preset Browser.
Factory Presets: Display all available Factory Presets in the browser window below.
User Presets (F): Manage your customized presets. Click the folder icon to create a new folder. The disk icon will save your preset. Right-click presets: Lets you assign the selected preset as the default (startup) preset. With user presets you can also choose to delete or overwrite the preset.
Tip
Some of the factory preset names are longer than the Preset Browser can display. Hover over the preset name with your mouse to see the full name in the lower left corner of the plug-in interface!
Output Meter (E): Shows the levels of all output channels. Clicking on the numerical peak displays above the meters resets the peak values. Output Gain (E): The white level markers work as sliders and let you adjust the volume of the processed signal for each channel individually. Alt/Option + drag adjusts all sliders. Ctrl/Cmd + click resets the level.
Show / Hide Meters (H): switches output meter visibility to gain more space for the main processing elements. You can SOLO channels separately by clicking on the channel names below the meters (G). Solo channels will be displayed in red.